
DIY Home Insulation Tips
Many home owners choose to install their own home insulation. It is important that you know how to install insulation correctly, as installing it incorrectly can be dangerous and can reduce the effect of the insulation by up to 50%. If you choose to take on a DIY home insulation project, we strongly recommend that you familiarise yourself with the proper process. Make sure you check the relevant standards prior to commencing the installation.
How to install insulation
In this section of our website we have collected a number of links, safety considerations and tips and tricks which have helped us over the years. By providing this information Pricewise Insulation does not recommend that you commence your DIY insulation project. We do not accept any responsibility for consequences arising from you relying on any of this advice or from your decision to go ahead with your DIY home insulation project.
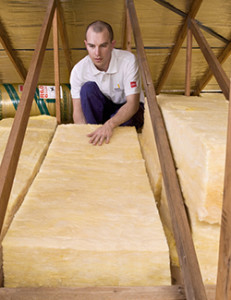
How to Install Ceiling Insulation
Do not start work until the site is safe!
DIY insulation must be installed to the requirements of relevant standard: NZS 4246:2006
Step 1
Ensure you have the right product for your DIY insulation project. Check that you have the correct R-Value required, as shown on the drawings/plans.
Check the joist width to determine the correct insulation segment width. (e.g. 430mm or 580mm)
Think logically when planning how to install ceiling insulation. Start from the furthest point, ensuring the top plate (top of the wall) is covered and work back towards the access hatch of the ceiling.
When installing, energize each segment by giving it a light shake and gently bouncing it on its side. This helps the segment expand to the thickness specified on the label.
 Step 2
The insulation may be trimmed to appropriate sizes if required.
Make sure that you leave sufficient clearances around recessed lights, extractor fans, chimney elements and piping as appropriate.
Where possible, place insulation under electrical cables and duct work.
Use any off-cuts to fill voids.
Glue or fix insulation to the back of the access lid or hatch.
Step 3
Always make sure your insulation has a snug fit, with a uniform finished height of insulation. Check out our tips and tricks for good techniques on how to insulate a roof with a uniform finish.
Step 4
Once you have completed your insulation installation DIY project, make sure you keep a copy of the product specifications together with the documentation of your house.
Video: How to install insulation in ceiling
In this video we show you how to install ceiling insulation using a quick, clean and easy method. Pink Batts Ceiling Insulation products are perfect for your insulation installation DIY project.
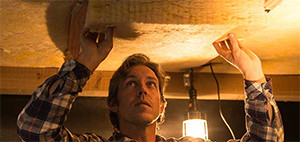
How to Install Wall Insulation
Do not start work until the site is safe!
Installation must be completed to the requirements of relevant standard: NZS 4246:2006
Step 1
Ensure you have the right product for the application. Check that you have the correct R-Value required, as shown on the drawings/plans.
Check the joist width to determine the correct insulation segment width. (e.g. 430mm or 580mm)
Work progressively around the perimeter of the building/room.
When installing, energize each segment by giving it a light shake and gently bouncing it on its side. This helps the segment expand to the thickness specified on the label.
Step 2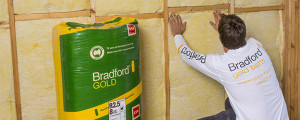 The insulation may be trimmed to appropriate sizes if required.
When cutting to fill a void, oversize by around 10mm to ensure a snug fit.
Do not fold or compress the insulation material.
Fill gaps around lintels, double framing, windows and doors with off-cuts.
Trim and place product around vents to allow ventilation systems to operate as intended.
Shape and fit insulation behind electrical wiring and plumbing work.
Use string to hold in place (if required).
Ensure insulation does not protrude beyond the line of the studs.
Step 3
Always make sure your insulation has a snug fit, with a uniform finished height. Check tips and tricks for good techniques in achieving this.
Step 4
Once you have completed your DIY insulation project, make sure you keep a copy of the product specification with the documentation of your house.
DIY Video: How to Install Wall Insulation
Do not start work until the site is safe!
Installation must be completed to the requirements of relevant standard: NZS 4246:2006
Step 1
Ensure you have the right product for the application. Check that you have the correct R-Value required, as shown on the drawings/plans.
Check the joist width to determine the correct insulation batt width. (e.g. 430mm or 580mm).
The insulation should always be fitted with strapping.
If fitted to fold down the fold should be no more that 75mm below the bottom of the product.
Start from the furthest point ensuring the bottom plate is covered and work back towards the access entrance of the underfloor.
When installing, energize each segment by giving it a light shake and gently bouncing it on its side, to help the segment expand to the thickness specified on the label.
Step 2
The insulation may be trimmed to appropriate sizes if required.
Place insulation in accordance with NZS 4246:2006, ensuring appropriate clearances from recessed lights, plumbing, extractor fans, chimney elements and piping.
Refer to relevant standard for guidance regarding placement of insulation and stapling around electrical wiring. EXTREME CAUTION REQUIRED! If insulation is covering any wires, apply the Electrical Hazard labels at that point.
 Step 3
Place long edge side of the insulation first neatly into the joist/underside of floor intersection
Pressure fit the body of the insulation flush up under the floor
Fold the opposite edge down so that a snug fit is achieved
Leave no gaps between the insulation and the framing and the underside of the floor
Fix strapping across the underside of the segment
Each segment should have three runs of strapping applied, one at approx. 100mm from each end and one diagonal or across the center of the segment.
Always ensure the insulation has a snug fit. Refer to the tips and tricks for techniques to reach tight spaces.
Step 4
Once you have completed your DIY insulation project, make sure you keep a copy of the product specification with the documentation of your house.
DIY Video: How to Install Pink Batts Insulation
In this video we show you how quick, clean and easy it is to install Pink Batts Snugfloor Insulation under the floor of your home.
Basic Tips for Installing Insulation
The following installation principles will ensure the best possible performance from your DIY home insulation project.
- Avoid gaps in insulation
- Do not compress bulk home insulation
- Eliminate thermal bridges (e.g. metal framing, steel beams)
- Allow clearance around appliances and fittings
- Protect your home insulation from contact with moisture
- Provide a sealed air space with reflective insulation
- Provide vapour and moisture barriers to prevent condensation
Tips to improve thermal performance of home insulation
- Fit segments snugly, leaving no gaps around ducts and pipes
- Make sure corners, junctions of wall-floor-ceiling are fully covered
- Isolate metal framing from contact with cladding
- Insulate window frames or install windows with thermal breaks
Home Insulation clearance requirements
Some appliances and fittings, such as recessed downlights and heater flues, require free space around them for the dissipation of heat, to reduce fire hazard. Insulation should not be placed against these fixtures.
- Recessed downlights – Minimum clearance of 25mm
- Flues and exhaust fans – Minimum clearance of 25mm
- Electrical wiring – Keep wiring clear of insulation (check with electrician before installing insulation)
Condensation
Home insulation, correctly installed, can keep the interior surface temperature of ceilings and external walls above the dewpoint, preventing condensation on these surfaces. Condensation control involves preventing moist air from coming into contact with cold surfaces below the dewpoint of the air by one or more of the following means:
- Good ventilation of the moisture-laden air
- Insulation to keep ceiling and wall temperatures above dewpoint
- Heating to prevent indoor surfaces from cooling below the dewpoint
Protect insulation from contact with moisture
Masonry walls are not waterproof. In both brick veneer and double-brick wall construction a cavity between the external masonry wall and the internal lining keeps the internal lining dry. Moisture on the internal face of the external masonry wall can drain away through weepholes or evaporate into the cavity.
- Brick veneer construction – make sure the insulation remains within the frame. Use reflective foil, galvanized wire or building paper to keep the bulk insulation in place
- Cavity masonry walls – restrain bulk insulation to maintain at least 30mm cavity
- Existing wall cavities – use ‘cavity fill’ water-repellent loose-fill granular rockwool insulation. This material contains a water repelling agent to prevent absorption of moisture.
Sealed air space with reflective foil
- Reflective insulation adjacent to a solid surface without an airspace, has no insulative value and acts only as a vapour barrier. To add thermal resistance, reflective insulation must face a sealed air space.
- Maintain a sealed air space of at least 25 mm;
- Eliminate air movement between air spaces on either side of the foil;
- Overlap sheets by 150 mm and tape over joins; seal any gaps;
- Use face-of-wall brick ties instead of ties which penetrate the foil;
- Reflective surfaces should be kept clean and dust free, vertical installation is best for this.
Safety
It’s important that home insulation is installed correctly to meet New Zealand standards. It is safer to have insulation installed by a reputable licensed installer. Installing home insulation carries potential risks and may require expert knowledge and assistance. Some types of home insulation require the use of specialised equipment, masks and protective clothing. Electrical and fire safety are particularly important issues.
Clearance around appliances and fittings
Some appliances and fittings, such as recessed downlights and heater flues, require free space around them for the dissipation of heat, to reduce fire hazard. Insulation should not be placed against these fixtures. Regulations and manufacturers’ recommendations should always be checked before installing home insulation.
Rules of thumb – insulation clearance requirements
- Recessed downlights – Minimum clearance of 25mm
- Flues and exhaust fans – Minimum clearance of 25mm
- Electrical wiring – Keep wiring clear of insulation (check by electrician before installing insulation)
Caution when using foil products
- Keep foil products away from electrical power outlets or lights as they can conduct electricity through the aluminium metal reflective covering.
- Care must also be taken when installing under metal or tile roofs.
Protective clothing
- Always wear goggles, a dust mask, gloves, long pants and a long sleeve shirt when putting in home insulation in the roof space
Make the job easier with these tips
Tip 1 – Preload the ceiling before plastering
If you are building a new home it is a good idea to get the insulation above the ceiling before the roof space is enclosed.
Tip 2 – Handy stick for tight spaces
For hard to reach areas, use a broom handle with a nail through the tip to spike the segment and position it.
Tip 3 – Extra ventilation in roof space
You need ventilation while you work. If the roof is tiled, kick back some tiles for ventilation.
Tip 4 – Hot weather
Try to avoid installing on a hot day. If you are, start nice and early and drink plenty of water throughout the day.
Tip 5 – Use a crawling board
Use plywood or a wooden plank ca.18x400x1200mm to support yourself over the ceiling rafters.