INSULATION CALCULATOR
How Much Does It Cost To Insulate a House in NZ?
The cost of insulating a house in New Zealand will typically come down to 5 factors:
- Which areas of the house require insulation (walls, ceiling, underfloor)
- The total m2 of each of these areas
- The R-Value of the insulation (this will typically vary between areas of the house)
- Which type of insulation you need or simply prefer (e.g. glasswool, or polyester)
- Will you be installing the insulation yourself, or hiring a contractor?
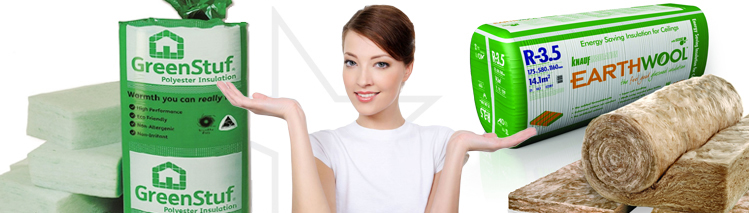
Of course the insulation brand will also affect the final price, and there are some key differences between the brands which may be worth noting. However for the purpose of the insulation estimator charts below, we will compare two very popular and yet different brands of insulation: Knauf Earthwool (made from glasswool) and Autex GreenStuf (made from polyester).
Insulation is a bulky product, and as a DIY installer you may prefer to get the insulation delivered to your door, rather than organising a large enough delivery vehicle and/or a trailer to pick up the insulation.
How Much Insulation Do I Need?
Further down the page, we detail the steps required to accurately measure up the various parts of your house which require insulation. You will also need to determine which R-Value you need. If in doubt, always err on the side of a higher R-Value, especially when installing wall or underfloor insulation. (If you get it wrong in the ceiling, you’ll often have the option of topping it up later with an extra layer, but that’s not so practical when the wall cavity has already been sealed up with plasterboard!)
As a general rule, you will need 10% less insulation than the area you are covering. This is because the timber studs and joists also use up some of the space. Of course, if you’re insulating above your ceiling and you decide to lay the insulation segments or rolls perpendicular (i.e. across) the ceiling joists, then you won’t need to make any reduction allowance for the framing.
The amount of insulation you will need for your underfloor, will usually correspond closely to the ceiling. There is no fixed relationship between the ceiling and wall insulation coverage, since this is significantly impacted by the amount of doors and windows throughout the house, which can vary a lot.
Insulation Cost Calculator
The cost of insulation per square metre comes down to the brand/type and the R-Value.
In preparing the below insulation cost calculators, we’ve assumed that you are building or renovating a regular house on the outskirts of Auckland. Our “example house” is a single storey house, with an exposed (raised) underfloor. We assume you will be getting the insulation delivered, and you plan to install the insulation yourself. Noise is not an issue, so you aren’t planning on installing high density acoustic insulation between rooms, i.e. in the internal walls.
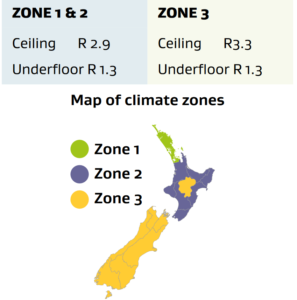
While it’s highly unlikely that your home insulation project will correspond exactly to the dimensions in the example provided below, it will however provide you with some handy reference points, and a quick means of comparing the prices between these two brands, and between two popular R-value options, both of which meet or exceed the minimum requirements for Zone 2, which includes Auckland.
Note: different types, brands and R-Values of insulation come bagged in different m2 quantities. Since you will always need to round up to the nearest full bag or “bale”, the exact “square metre cost” of your project will also vary accordingly. The scenario below factors in any un-used leftover insulation due to the necessary rounding up, based on the dimensions used in this example.
Having carefully measured up the house, you’ve arrived at the following dimensions:
| Area | m2 to cover | m2 required | Potential energy savings | Other potential benefits |
|---|---|---|---|---|
| Ceiling | 180 | 180 | >40% | Some acoustic benefits (heavy rainfall noise etc.) |
| External Walls | 102 | 92 | >25% | Some acoustic benefits (outdoor/neigbour noise) |
| Underfloor | 180 | 162 | ~10% | Avoid “chilly floorboards” in winter |
Cost Of Insulating Ceiling, Wall and Underfloor
Now let’s take a quick look at the cost of insulating the various areas of the house. We’ve listed these areas in order of importance from a thermal insulating perspective, i.e the ceiling insulation will have the biggest impact, followed by the wall insulation, and finally the underfloor insulation.
Cost of Ceiling Insulation
| Brand/Product | Made from | R-value | Installation | Cost inc. GST |
|---|---|---|---|---|
| Autex GreenStuf Ceiling Rolls | Polyester | R2.9 | Lay the insulation rolls across the top of the ceiling joists | $2,762 |
| Autex GreenStuf Ceiling Rolls | ” “ | R3.6 | ” “ | $4,104 |
| Knauf Earthwool Ceiling Rolls | Glasswool | R2.9 | ” “ | $1,776 |
| Knauf Earthwool Ceiling Rolls | ” “ | R3.6 | ” “ | $2,388 |
Cost of Wall Insulation
| Brand/Product | Made from | R-value | Installation | Cost inc. GST |
|---|---|---|---|---|
| Autex GreenStuf Wall Segments | Polyester | R2.2 | Install rectangular segments between vertical wall studs prior to plaster | $1,658 |
| Autex GreenStuf Wall Segments | ” “ | R2.5 | ” “ | $2,805 |
| Knauf Earthwool Wall Segments | Glasswool | R2.2 | ” “ | $1,029 |
| Knauf Earthwool Wall Segments | ” “ | R2.6 | ” “ | $1,368 |
Cost Of Underfloor Insulation
| Brand/Product | Made from | R-value | Installation | Cost inc. GST |
|---|---|---|---|---|
| Autex GreenStuf Underfloor Rolls | Polyester | R1.5 | Staple rolls to side of the floor joists, just underneath the floorboards | $1,675 |
| Autex GreenStuf Underfloor Rolls | ” “ | R1.8 | ” “ | $2,007 |
| Knauf Earthwool Underfloor Rolls | Glasswool | R1.8 | ” “ | $1,823 |
Main Differences Between Earthwool and GreenStuf Insulation
Although Earthwool and GreenStuf are quite different products, they are both very popular in New Zealand, and for good reason. The below table shows a quick comparison between the two brands:
| Brand | Materials | Installation/handling | Environmentally friendly | Cost |
|---|---|---|---|---|
| Earthwool | Low-itch Glasswool | Easy to install, cut to length with a sharp knife | Yes – mainly made from recycled glass and sand | Cheaper than Greenstuf |
| GreenStuf | 100% polyester | Easy to install, can be easily torn or cut to length | Yes – mainly made from recycled plastic | More expensive than Earthwool |
It’s important to understand that the R-Value of different products is comparable between brands, meaning that an R3.6 Earthwool can be expected to perform exactly the same as an R3.6 GreenStuf, after the insulation has been installed.
How To Measure and Calculate How Much Insulation Your Need
You will need:
- Tape measure
- Pen & paper
- Calculator
Calculating the Ceiling Area to be Insulated
- Measure the full width and length of the house (1)
- Measure and note down the dimensions (width x length) of any skylights or any inaccesible areas (2)
- (1) minus (2) = your total ceiling area to be insulated
For insulating between the joists you will need insulation equating to approximately 90% of the ceiling area to be insulated
For insulation blankets that will cover the joists you will need insulation equating to 100% of the ceiling area to be insulated
Calculating the Wall Area to be Insulated
- Measure the outside perimeter of the entire house (1)
- Measure the height of the walls (2)
- (1) x (2) = Total wall area (3)
- Measure (width x height) all windows, doors or other areas not requiring insulation (4)
- (3) minus (4) = Total wall area to be insulated
Bulk wall insulation is installed between the vertical studs. You will need insulation equating to approximately 90% of the wall area to be insulated.
Calculating the Underfloor Area to be Insulated
- Measure the outside perimeter of the entire house (1)
- Measure and note down the dimensions (width x length) of any inaccessible areas (2)
- (1) minus (2) = total underfloor area to be insulated
Bulk underfloor insulation is installed between the floor joists. You will need insulation equating to approximately 90% of the underfloor area to be insulated.
Can Anybody Install Insulation?
If you’re reasonably fit and able-bodied, and able to use basic hand tools such as a commercial stapler, there is usually no reason why you shouldn’t be able to install your own insulation. Professional insulation contractors will almost always quote and charge on a m2 basis, which can add significantly to the cost of your home insulation project. It’s important to note that using a professional installer will not necessarily provide you with a “better” result, although an experienced installer will probably be able to finish the job in less than half the time.
Wall insulation is the easiest to install – most of the work can be done standing in an upright position, and for the majority of the work you won’t even need a step ladder.
Ceiling insulation can be installed before plaster (i.e. from underneath) or from above (after the plaster is in place.) Installing from underneath requires some technique – installers use a couple of “sticks” to lift and push the insulation into place. Installing roof insulation after plaster (often called “retro” installing) means squatting or crawling on your hands and knees, unless the roof pitch is so high and steep that it enables you to stand and walk upright.
The level of difficulty involved with installing underfloor insulation mainly comes down to the access height. At its best, the underfloor might be just above your head height, and at its worst, you may find yourself lying on your back with a bare minimum clearance between yourself and the floor joists.
Can I Install Insulation By Myself?
Many insulation contractors prefer to work in teams of two. In addition to the social or “morale boosting” aspect, there’s also a practical and economical reason for this; a team of two will often be able to complete a job in less than half the time, compared to either one of the installers working by him or herself. Tasks such as “pre-loading the ceiling” are more easily accomplished by two people, and in hard to access areas, it can be invaluable having a work partner to pass over the insulation segments or rolls, one at the time and at the right intervals. For the more “difficult” jobs, we’d probably recommend working together with one other capable person, and for easy-to-access jobs, you should be fine finishing it all off yourself if that’s what you prefer.